Introduction
I recently took a little interest in Java Card™ development, and it turns out that configuring a proper development environment is not that easy.
Essentially, the resources I had were tailored for Windows, but I wanted to be able to develop Java Card™ applications under Linux. This post is comprised of two main parts: Setup of the environment to communicate with a card, and adapting the IzyNFC eclipse plugin to support Linux environments.
Setup
The prerequisites are of two kinds: software and hardware.
Hardware :
- Omnikey Reader 5325 (Another would do just fine)
- Java Card Platform Gemalto TOP NX4
Software :
- Omnikey driver (for Linux)
- Java Card™ SDK (for Linux)
- Eclipse Oxygen (should work on prior versions)
- IzyNFC (patched)
I work on my home computer, an Arch Linux with x86_64 architecture.
Installation
The Omnikey driver for Linux is easy enough to get, it can be found here. The following dependencies are required :
- pcsclite (>1.5.5)
- libusb (>1.0.8)
On Arch Linux:
# Install dependencies
$ sudo pacman -S pcsclite pcsc-tools

$ pushd /tmp
# Install the driver
$ wget https://www.hidglobal.com/sites/default/files/drivers/ifdokccid_linux_x86_64-v4.2.8.tar.gz
$ tar xzf ifdokccid_linux_x86_64-v4.2.8.tar.gz
$ pushd ifdokccid_linux_x86_64-v4.2.8
$ sudo ./install

$ popd
$ popd
Of course, review the material before installing it if you want to. For example when a crash occurs, there is a script (/usr/sbin/ifdok_bugreport) which creates a tar.gz with CPU and distribution information, then prompts you to send it to the support.
Now, you can run the pcscd daemon and start a scan for PCSC devices.
$ sudo systemctl pcscd
$ pcsc_scan

PC/SC device scanner
V 1.5.2 (c) 2001-2017, Ludovic Rousseau <ludovic.rousseau@free.fr>
Using reader plug'n play mechanism
Scanning present readers...
0: OMNIKEY CardMan (076B:5125) 5125 (OKCM0022611092127015040621564200) 00 00
1: OMNIKEY CardMan (076B:5125) 5125 (OKCM0022611092127015040621564200) 00 01

 # <- Card inserted here

Fri Oct 13 12:07:33 2017
 Reader 0: OMNIKEY CardMan (076B:5125) 5125 (OKCM0022611092127015040621564200) 00 00
  Card state: Card removed,
 Reader 1: OMNIKEY CardMan (076B:5125) 5125 (OKCM0022611092127015040621564200) 00 01
  Card state: Card removed,

Fri Oct 13 12:08:12 2017
 Reader 0: OMNIKEY CardMan (076B:5125) 5125 (OKCM0022611092127015040621564200) 00 00
  Card state: Card inserted,
  ATR: 3B 7D 96 00 00 80 31 80 65 B0 83 11 D0 A9 83 00 90 00

ATR: 3B 7D 96 00 00 80 31 80 65 B0 83 11 D0 A9 83 00 90 00
+ TS = 3B --> Direct Convention
+ T0 = 7D, Y(1): 0111, K: 13 (historical bytes)
  TA(1) = 96 --> Fi=512, Di=32, 16 cycles/ETU
    250000 bits/s at 4 MHz, fMax for Fi = 5 MHz => 312500 bits/s
  TB(1) = 00 --> VPP is not electrically connected
  TC(1) = 00 --> Extra guard time: 0
+ Historical bytes: 80 31 80 65 B0 83 11 D0 A9 83 00 90 00
  Category indicator byte: 80 (compact TLV data object)
    Tag: 3, len: 1 (card service data byte)
      Card service data byte: 80
        - Application selection: by full DF name
        - EF.DIR and EF.ATR access services: by GET RECORD(s) command
        - Card with MF
    Tag: 6, len: 5 (pre-issuing data)
      Data: B0 83 11 D0 A9
    Tag: 8, len: 3 (status indicator)
      LCS (life card cycle): 00 (No information given)
      SW: 9000 (Normal processing.)

Possibly identified card (using /usr/share/pcsc/smartcard_list.txt):
3B 7D 96 00 00 80 31 80 65 B0 83 11 D0 A9 83 00 90 00
	GemSafe V2 (2.04, GemP15-1)
	Gemplus GemXpresso Pro R3 E32PK
	Gemalto TOP IM GX4
The card is properly recognised by the reader 0 of the device. In fact, the other reader (reader 1) is for contactless communication.
Now that the communication between a card and the computer is established, we can start developing for it.
Development environment
The standard JDK is required, and the Java Card™ Development Kit as well. Per its specifications, the Gemalto NX4 card supports JCDK version 2.2.1 and GlobalPlatform 2.1.1.
The JCDK can be retrieved from Oracle’s website.
The IzyNFC plugin used is in fact a wrapper to the JCDK. It needs to be provided the path to the JCDK and the path to export files (.exp) of the javacard framework. Here is the directory structure that I have and the configuration file associated:
$ mkdir -p smartcard/javacard
$ cd smartcard/javacard
$ unzip java_card_kit-2_2_1-linux_dom.zip -d smartcard/javacard
$ mv javacard.cprofile smartcard/javacard.cprofile

$ tree smartcard
smartcard
├── javacard
│   └── java_card_kit-2_2_1
│       ├── api_export_files/
│       ├── bin/
│       ├── COPYRIGHT_dom
│       ├── doc/
│       ├── lib/
│       ├── LICENSE.html
│       ├── RELEASENOTES.html
│       └── samples/
└── javacard.cprofile

$ cat smartcard/javacard.cprofile
<?xml version="1.0" encoding="UTF-8" standalone="no"?>
<profiles>
  <profile id="java_card_221">
    <name>Java Card 2.2.1</name>
    <description>Java Card (TM) 2.2.1</description>
    <jcdkpath>javacard/java_card_kit-2_2_1</jcdkpath>
    <converterpath>javacard/java_card_kit-2_2_1/lib/converter.jar</converterpath>
    <classpath>
      <path>javacard/java_card_kit-2_2_1/lib/api.jar</path>
    </classpath>
    <exportpath>
      <path>javacard/java_card_kit-2_2_1/api_export_files</path>
    </exportpath>
  </profile>
</profiles>
IzyNFC is the continuation of Eclipse OJCF, another plugin for Java Card™ development. However, it supports only Windows environment out of the box. The version I provide here has been patched in order to support Linux environments.
Thing is, there is a mismatch between the source code available and the last version released. Hence, in order to patch it I reverse engineered the plugin and modified Java bytecode directly. The detail of the modifications comes in a moment.
To install the plugin:
- Unzip the archive under
/tmp/IzyNFC - On Eclipse, Help -> Install New Software…
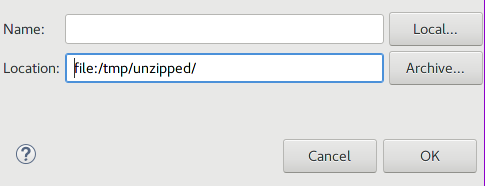
- Under Add… -> Archive… ; select the directory
/tmp/IzyNFC - Install the plugin as usual and restart Eclipse.
- You’ll need to set the IzyNFC configuration file
javacard.cprofile

Eclipse - Add a local archive as software repository
You can create a new Java Card™ project. In order to convert the HelloWorld applet, create a new package called helloworld and put the file HelloWorld.java in it. Now, you can convert this first app.
- Set the package AID: Right-click on the package, then Java Card™ Tools -> Set package AID.
- Set the application AID: Right-click on the java file, then Java Card™ Tools -> Set applet AID.
- Convert the application: Right-click on the package, then Java Card™ Tools -> Convert.
And here it is, a Java Card™ applet properly created under Linux environment. All that’s left is to deploy and test it on the card reader (not detailed here).
IzyNFC
The IzyNFC plugin is licensed under LGPL v2, currently hosted on Sourceforge. I didn’t try to contact the maintainers to get source code matching the last version, as I wanted to learn to work with Java bytecode and it made a suitable exercise.
Essentially, I worked with the ASM framework and the plugin Bytecode Outline which uses it. This combination allows to disassemble a class file and to get the corresponding code to re-write the file using ASM.
I also discovered the project Bytecode Viewer which wraps several tools in order to ease reverse engineering. However, the zips and jars produced are not understood by eclipse, but I didn’t investigate further. Hence I sticked to ASM to modify class files.
I started from the original plugin, which can be retrieved here.
Step 1 : Proof of Concept
The first step has been to be able to modify the plugin, re-install the modified version and assert it has properly been modified. For the moment, just changing a String in the Preferences panel would do.
The unzipped plugin is arranged like this:
$ unzip com.francetelecom.ndk.ojcf.updatesite_4.1.0.20130306.zip -d izynfc
$ tree izynfc
izynfc
├── artifacts.jar
├── content.jar
├── features
│   └── com.francetelecom.ndk.ojcf_4.1.0.20130306.jar
├── index.html
├── plugins
│   ├── com.francetelecom.ndk.ojcf.branding_4.1.0.20130306.jar
│   ├── com.francetelecom.ndk.ojcf.commands_4.1.0.20130306.jar
│   ├── com.francetelecom.ndk.ojcf.core_4.1.0.20130306.jar
│   ├── com.francetelecom.ndk.ojcf.help_4.1.0.20130306.jar
│   ├── com.francetelecom.ndk.ojcf.launching_4.1.0.20130306.jar
│   ├── com.francetelecom.ndk.ojcf.perspectives_4.1.0.20130306.jar
│   ├── com.francetelecom.ndk.ojcf.preferences_4.1.0.20130306.jar
│   ├── com.francetelecom.ndk.ojcf.welcome_4.1.0.20130306.jar
│   └── com.francetelecom.ndk.ojcf.wizards_4.1.0.20130306.jar
├── site.xml
└── web
    ├── site.css
    └── site.xsl
The preferences panel seems an easy place to perform this modification, as it would be immediately visible. Let’s try to modify a piece of it.

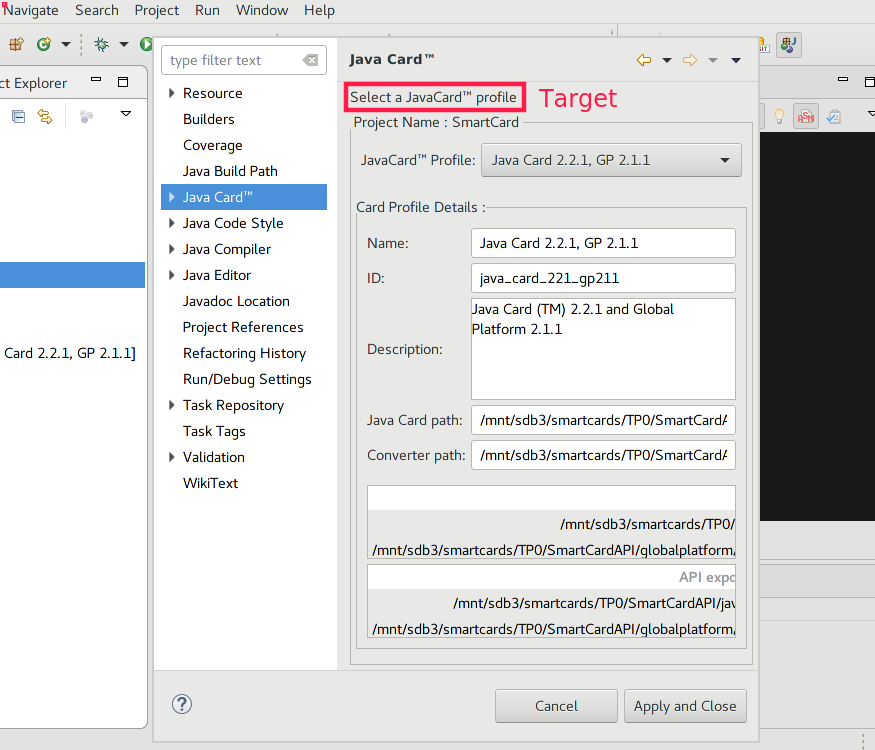
String to modify on the Preferences panel
The preferences jar file is promising. A quick String search shows that Select a Java Card™ profile is indeed declared in com.francetelecom.ndk.ocjf.property.page.JCProjectProperty. The constructor uses it like this:
aload 0
ldc "Select a Java Card\u2122 profile"
invokevirtual com/francetelecom/ndk/ojcf/property/pages/JCProjectPropertyPage.setDescription (Ljava/lang/String;)V
This is the equivalent of this.setDescription("Select a Java Card™ profile"); and looks what we seek. A quick modification and the preferences jar can be updated with the new class file.
Eclipse has a plugin cache which caused me some troubles. In order to properly re-install the plugin, first uninstall it in the Preferences panel. Then, eclipse must clear its cache, it can be done by starting it with the -clean argument: eclipse -clean. Finally, the plugin can be reinstalled.

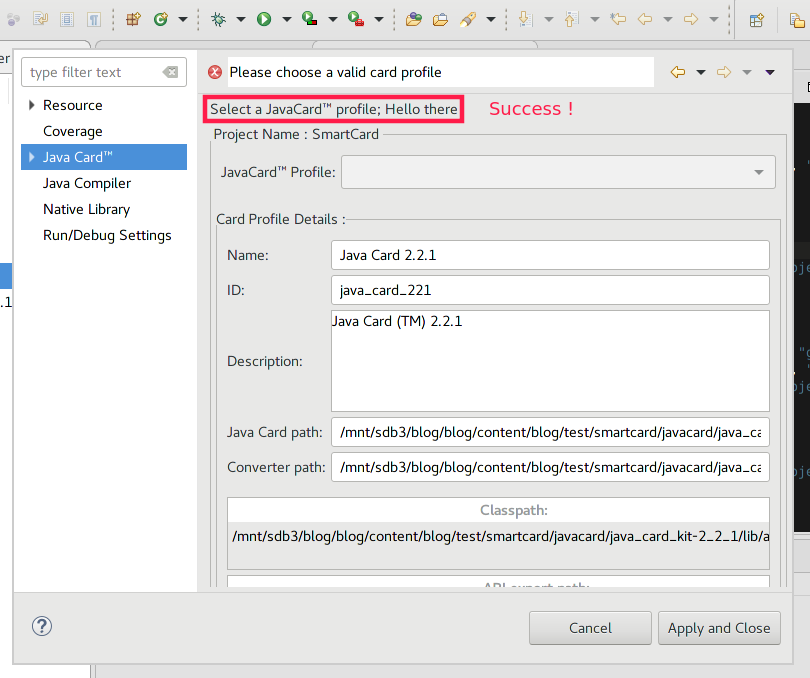
IzyNFC has been modified
The plugin has been successfully modified, time to analyse why it doesn’t work.
Step 2 : Recognise the SDK
The first problem encountered is that the plugin does not recognise the SDK. The configuration file is properly parsed, but somehow the entry for SDK 2.2.1 doesn’t appear in the list of available configurations.
After looking at the differences between the Windows JCDK and the Linux JCDK, there is something about the bin folder:
$ tree linux_jcdk-221/bin
linux_jcdk-221/bin
├── apdutool
├── capdump
├── capgen
├── converter
├── cref
├── exp2text
├── jcwde
├── scriptgen
├── verifycap
├── verifyexp
└── verifyrev

$ tree windows_jcdk-221/bin
├── apdutool.bat
├── capdump.bat
├── capgen.bat
├── converter.bat
├── cref.exe
├── exp2text.bat
├── jcwde.bat
├── scriptgen.bat
├── verifycap.bat
├── verifyexp.bat
└── verifyrev.bat
Indeed, by changing the filenames under bin to match filenames of the Windows JCDK, the plugin recognises the SDK. In fact, after trying several configurations I figured out that it searches for the presence of bin/cref.exe.
Searching for the constant "cref.exe" inside class files yields a result for com.francetelecom.ndk.ojcf.core.CardProfile, in the core jar. Let’s start the reverse there !
The check is performed in the method public IStatus validateJCDKPaths(String). After staring at the bytecode for some time, here is what it more or less does (skipping boring parts):
- Opens the directories
binandlib. - Gather files into those directories into an intermediate array, if they end with “jar”, “bat” of “exe”.
- For each file in this array, put it inside another array depending on its extensions: files ending in “.jar” into jarFiles, “.bat” into batFiles and “.exe” into executableFiles
- For each file in
executableFiles, if one of them ends withcref.exethen return successfully. - For each file in
batFiles, if one of them ends withcref.batthen return successfully. - Return with an error code because the JCDK path is invalid.
I did a quick fix for this: my goal is to make the plugin work on Linux, so I didn’t really care about regressions for Windows. By changing only two String constants and one instructions.
Putting all the files into the intermediate array, regardless of their extension: In order to find all files under the bin directory, the function OJCFCore.searchFile is called, which is a delegate for FileUtils.listFiles. Instead of passing the array of extensions {“jar”, “bat”, “exe”} to the function, I passed null, which returns a Collection matching everything. So aload 6 became aconst_null.
For populating the batFiles array, the code did a check like curFile.endsWith(".bat"). I changed the String constant by changing the instruction ldc ".bat" to ldc "".
Finally, the check for the presence of cref.bat was curFile.endsWith("cref.bat") (simplified). Here, the instruction ldc "cref.bat" was turned into ldc "cref".
In the end, the Linux Java Card™ Development Kit is recognised by IzyNFC simply with those little modifications. It may have broken something else (hard to estimate side-effects when tampering with bytecode…), but I didn’t see any.
Step 3: Convert an application
Now that the SDK is seemingly usable, we can try to convert the HelloWorld applet. However, when doing so the Converter fails and seemingly can’t find export files. The exact message is error: export file framework.exp of package javacard.framework not found.
In order to convert an applet into a .cap, the plugin loads the converter provided in the JCDK then calls it with the necessary arguments: classpath, exportpath, applet version, applet aid, package aid.
The arguments String is logged by the plugin, but at first sight nothing was unusual. After some digging to see if it was properly passed on to the program, nothing came up. What was weird was that the same code (aside the little modifications) worked for Windows computer. I ended up calling the converter myself with several sets of arguments to see the difference between the expected string and the one produced by IzyNFC.
Doesn't work:
arguments: -classdir "/home/xxx/Test/bin" -d "/home/xxx/Test/deployed/Java Card 2.2.1" -exportpath "/home/xxx/Test/bin;/home/xxx/Test/smartcard/javacard/java_card_kit-2_2_1/api_export_files;" -applet 0x01:0x02:0x03:0x04:0x05:0x06:0x00 helloworld.HelloWorld -out CAP EXP JCA -verbose helloworld 0x01:0x02:0x03:0x04:0x05:0x06:0x70:0x00 0.26

Works:
arguments: -classdir "/home/xxx/Test/bin" -d "/home/xxx/Test/deployed/Java Card 2.2.1" -exportpath "/home/xxx/Test/bin:/home/xxx/Test/smartcard/javacard/java_card_kit-2_2_1/api_export_files:" -applet 0x01:0x02:0x03:0x04:0x05:0x06:0x00 helloworld.HelloWorld -out CAP EXP JCA -verbose helloworld 0x01:0x02:0x03:0x04:0x05:0x06:0x70:0x00 0.26
In the exportpath argument, the separator character is not the right one. The JCDK expects a list separated by colons ‘:’ but the plugin provides a list separated by semi-colons ‘;’.
After reversing how the commands were called and the arguments formed, the class asm.com.francetelecom.ndk.ojcf.core.launchers.arguments.ArgumentsPreparer from the core jar emerged. The function prepareConverterArguments indeed perform the task. All there is to do is change the little ldc ";" into an ldc ":".
Step 4: Synthesis
And that’s it, with this the plugin is able to convert applets into .cap files. This work was done for a very specific version of the JCDK, so I am not aware of the differences between versions. Thus it is highly possible that my fix would not support all versions.
However, this has shown that it doesn’t require much skills to reverse engineer Java bytecode, just some time to spare. All in all, I’m still pretty amazed that fixing an eclipse plugin which at first seemed quite daunting (never developed one myself) required only four instructions to be modified, among which three were String constants.
Conclusion
At this point, one should have a working Java Card™ development setup, both for hardware and software. The modification of IzyNFC has been detailed, so you can actually compare the plugin I provide with the one on sourceforge (do NOT blindly install software coming from random blogs). I may try to get my hands on the original source code, maybe not. Anyway, have fun with your Java Card™ development.
Still, I had a first taste of Java bytecode, and this was a fun experience overall. During my researches, I saw the project ant-javacard which seems to be able to convert applets and is still active, but I liked the integration of IzyNFC with eclipse so I didn’t look into it.


